Kate has achieved the coveted natural beauty look, and what's even better, she makes it appropriate for both the day and the night. Also, if you haven't heard, Kate did her own makeup for her engagement photos with Mario Testino back in the fall. And now she wants to do it again for the wedding!

How to emulate Kate's hair:
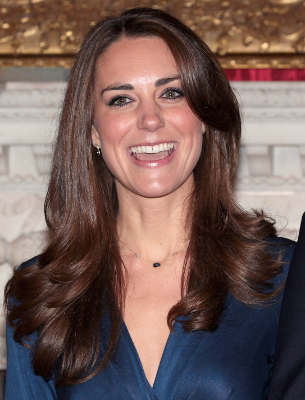
Kate's hair is obviously in perfect health, being both shiny and free of any visible split-ends. Use deep conditioning treatments weekly to get your locks up to snuff.
Next, Kate wears her hair long, and the same goes for her layers. The only shorter layers she sports are her side-swept bangs. I notice that her bangs are very versatile, in that they can be parted left or right. Make sure you tell your stylist that you want to be able to do the same with your hair and they can cut it accordingly.
Because of her longer layers, Kate needs body at her roots. Blow-out your hair using a brush to lift your roots as you dry. This will provide much needed lift. Also, remember to keep products away from your roots, to avoid excess oil that will weigh-down your hair. To give added lift to your roots, and to build even more body into your hair, try using the "Helen of Troy Tangle-Free Hot Air Brush" (http://www.folica.com/reviews/tools/hair-dryers/helen-of-troy-tangle-free-hot-air-brush#reviews_anchor).
Sometimes Kate's hair seems more wavy and at other times more curly. She is obviously blessed with great natural texture, but she also must use a flat iron to manage little fly-aways around her face and elsewhere to smooth out and polish her look overall. If you want to build in waves or curls, use a curling iron only at the bottom of your layers. Also, flip out your bangs only slightly so that they're back off of your face.
How to emulate Kate's makeup:
Kate never looks like she's wearing gobs of makeup, and that's they key to her look. Keep it simple people and focus on one aspect to really highlight, like she does with her eyes, and keep everything else more neutral and understated (like your skin, cheeks and lips).
Always cleanse your face well before applying your makeup. This, along with a proper toner and moisturizer (with an SPF), will ready your "canvas". I like to use a moisturizer specially designed for the delicate eye area as well, which helps makeup apply even more easily.
After this first step, apply your foundation. I prefer to only apply it to certain areas, rather than all over the face. This allows more natural skin to show through, avoiding that sometimes cakey look. Also, skip using concealer unless you absolutely have to. Just use foundation. Again, this helps to keep the look simple and usually less mask-like. I usually apply foundation (and sometimes concealer) under the eyes and on the lid, around and on the nose, upper lip area, and around the mouth down onto the chin. Make sure to blend, blend and blend some more! You don't want anything to look unnatural! Use your foundation brush to sweep the edges of the areas you applied foundation to in order to do this. Even sweep under the chin and along and under the jaw line as well.
Once you've applied your foundation (and maybe concealer), season depending (like spring and summer and early fall), sweep some bronzer (lightly at first and getting darker if needed) along your cheek bones, temples, up to the sides and top of your forehead. This will give you a warmer complexion and subtle glow. Next, apply some blush (lightly at first and getting darker if needed) to the apples of your cheeks (smile to find them) and along your cheek bones and lightly across your forehead and then down along your jaw line (lightly!). Nothing should really stand out, it should all look natural and blended.
Finally, the eyes. Kate does use and apply darker eye makeup, but she does it so nicely that it's never harsh or garish. She always lines her bottom and top lids, lightly or more heavily depending, with either a liquid liner or a pencil eyeliner. To achieve a polished look when applying your pencil eyeliner (which can sometimes be a tricky thing to do), use an eyeliner brush. It's small and pointed and on an angle. Smudge this along your lines (practice to see what effects you can create) and this will help to smooth out any problem areas without having to start over again. Liquid liners can also be tough to use, so use the same eyeliner brush and fill in any problem areas with a matching eyeshadow, or apply eye makeup remover to the tip of a Q-tip to remove anything you don't like. These little tricks will help to make your eyeliner (no matter what you use) look tidier, smoother and usually more defined. Sometimes Kate will be seen to wear more neutral shades of eye shadow on her lids and on other occasions she will opt for a fully shadowed darker lid (usually in greys) or just the corners (usually in black or charcoals). Always make sure to apply your mascara last! She has nicely defined lashes, but she obviously puts on more than one coat of mascara. But remember, avoid that clumpy look, that's never classy. Kate will sometimes almost invisibly apply a coat to her bottom lashes, just for subtle definition. But it's hardly noticeable, so take it easy! Curl lashes ever so slightly, nothing too noticeable, to finish with the eyes.
To finish off Kate's effortless perfect for all occasions makeup look, apply either a lightly coloured natural looking lip gloss (or clear) to your lips. It's rare that we see Kate in anything so bold as even a softly coloured lipstick. She keeps her lips young and fresh. Also, make sure to use a good moisturizing balm regularly to keep those lips hydrated!

No comments:
Post a Comment